Showing posts with label Sandwich fillings. Show all posts

Wednesday, 25 June 2014

Rocket & Roses Accidental Cashew Chilli Spread on a GF Tortilla with mixed peppers and fresh chives

Rocket & Roses Kitchen Play List:

Rival Sons ~ Before The Fire Album

Whew! Has it been a busy week here at R&R HQ. I can't believe tomorrow is Thursday. I have been recipe creating, testing and cooking...and in some cases re-cooking every day. I am exhausted but in one of the very best ways. I know I might pay for it later but right now I am enjoying the chaos...loving the challenge and revelling in the tiredness. It often happens that whilst testing out my new recipes I get lead astray by other ideas that pop into my mind. Almost always, I have a pad and pen near me to scribble these down for testing out later. But this week I was busy creating a noodle dressing using cashews as the base and at a taste testing stage I was bowled over by results. I stopped the testing there and removed some of the paste and schmeared it on an oatcake...yep...good creamy paste...a schoosh of bite from the fresh lime juice and a delicate sweet heat from the jalapeno pepper slices. It was like having sweet chilli sauce...only a creamy version and without all the added sugars and nastiness. Yep..3 simple ingredients and a blender and you have a delicious spread for crackers, sandwiches, wraps or toast. Marvellous...

Today I enjoyed some spread over a gluten-free tortilla wrap, topped with thin slices of mixed baby bell peppers and sprinkled with freshly cut chives. Not as sweet as you'd think it would be...and the chives provided a good dose of savouriness. So when I sat down at 4pm to eat lunch...(don't ask...busy, busy..lol) I really enjoyed this wrap and just knew you folks out there would too. Quite a sunny happy wrap eh? Right better get back to the kitchen...

Rocket & Roses Accidental Cashew Chilli Spread on GF Tortilla with Mixed Baby Peppers & Fresh Chives

Rocket & Roses Accidental Cashew Chilli Spread   Makes 1 cup
(Original recipe from the Rocket & Roses Vegan Kitchen)

1 cup of cashew pieces
juice of one large lime
2 thick slices of jalapeno chilli, jarred variety for the slight sweetness
(mine were in apple cyder vinegar which I can have..but use whatever ones you prefer folks)

Place the cashew pieces in a container and cover with water. Leave to soak for at least 30 minutes. The longer the better. 

Casually drain the cashew pieces and place them into a mini processor or equivalent. Blend until the pieces have broken down into a thick paste. Then pour in the lime juice and the slices of chilli. Blend for a few minutes until you have a smoother paste. Place the cashew mix into a airtight container and store in the fridge until needed. 

Enjoy!

Thanks for stopping by and I hope your Wednesday has been a good one...

~Red~ 

NB: This is my accidental creation and I have no problem with you using the recipe or sharing it but I simply ask that you give credit where it's due as I always try to...many thanks. Namaste ~R~
   

Saturday, 22 February 2014

Rocket & Rose's Black Olive Pate with Deliciously Ella's Superfood Bread (vegan, gluten & yeast free!)

Rocket & Roses HQ Play List:

Madonna ~ Erotica 
The Gossip ~ Keeping You Alive
Bon Jovi ~ You Give Love A Bad Name
Keith Urban ~ She's Gotta Be
ZZ Top ~ Gimme All Your Lovin'
John Lennon ~ (Just Like) Starting Over
Suzi Quatro ~ I've Never Been In Love
KORN ~ Burn The Obedient 
Joan Jett ~ Fetish
Jack Johnson ~ Fortunate Fool
Sara Sant'Ambrogio ~ Sonata Op 65: 1. Allegro Moderto
Depeche Mode ~ Higher Love
Queen ~ We Will Rock You
P!nk ~ Funhouse

*doing my happy dance from the kitchen, around the house and then finally crashing onto my office chair...but keeping my intensely large grin*  

The reason for this sudden burst of rampant happy filled dancing? Quite simply the gluten free, yeast free bread recipe I made this morning from DeliciouslyElla's blog. This goddesslike woman has created the most amazing gluten free recipes and earlier in the week I tested out the quinoa pizza crust and it was so good that it inspired me to keep testing the other recipes I had printed off of her site. Today was the turn of the Superfood Bread...

...now I admit I had begun to give up on ever enjoying a bread based food item again. I have tried many gluten free recipes both oven baked and in our bread machine and all were...awful. I dislike the sandy texture you get with many of the offerings out there. For the same reasons I dislike most shop bought gluten free products or they have eggs added to them..or a ton of junk that when reading through them I felt like my head was going to explode. Then I found out that I had an intolerance to yeast too...*sighs*...I then stopped trying to find a product as all vegan gluten free bread recipes seemed to rely heavily on yeast. Then I found Ella's blog....

I like Ella's recipes because they are simple recipes, with good healthy ingredients and they.....WORK! lol. The quinoa pizza was very much enjoyed and I can't begin to put into words just how much I enjoyed the Superfood Bread and for Ella's recipe click here! The bread is a good mix of nuts and seeds and I chose to use the buckwheat flour option although you could use brown rice flour instead. I also used psyllium husk powder for the first time. This loaf is laughingly simple to make and then after an hour of 'sitting' its goes into a moderate oven and 40 minutes later you have a great seedy loaf. The flavour is so good and almost reminiscent of my beloved wholemeal/granary loaves from the past. I loved it! Thank you once again Ella! (Update: It appears I forgot to add the herbs to my loaf but I didn't miss them until I was re-reading the recipe after writing this post...so just so you know..no herbs works fantastically as well)

Now as it is forever since I enjoyed a sandwich I knew I needed to create a new pate to spread on top of my slice. For some reason images of a creamy olive pate came to mind topped with a slice of a vine ripened tomato and some rocket leaves. Yes, my topping for my pizza also had a similar assembly but what can I say..I am a black olive, tomato and rocket addict. lol. That's why I chose the name of my blog...my love of Rocket leaves and white roses..lol. I digress...

This pate isn't as heady as full on olive tapenade and that is exactly what I wanted. I love olives but can find myself olived out with the tapenades. I chose to use a bean to add the creamy texture and my bean of choice is the humble Butterbean because I believe it gives a creaminess that the other white beans don't. However I suspect any white bean would work ok in this pate..choices is yours as ever folks. I also used garlic infused olive oil as I wanted subtle garlic rather than the raw hit. But if you need to reduce the oil...try using a small garlic clove..remove the centre core and then micro grate it into the processor. I also used the store cupboard ready-ground black pepper because I wanted the depth of flavour in this pate. After I had finished blending this pate together I made my final testing and was smiling all over the place...its been a good recipe day today. I love those days...lol. 

I've been creating in the kitchen whilst ML and our nephew Myles have been waging an epic war via Starwars...lol. The little guy came to stay over again last night after we share a great day out adventuring with him and his sisters. I love that he is still excited to stay over...

Ella's Superfood Bread open sandwiches, spread with R & R Black Olive Pate

Rocket & Roses Black Olive Pate    Makes 1 generous cup
(Original Recipe from the Rocket & Roses Vegan Kitchen) 

1 14oz tin of butter beans, rinsed and drained
15 large black olives 
2 tbsp garlic infused olive oil
1/2 of lemon juice 
1/2 tsp ground black pepper
a good sprinkle of Himalayan salt (optional)

In the bowl of a food processor, place the beans and olives and pulse until they have broken down a lot. Then drizzle the oil and lemon juice and pulse quickly once again. Then sprinkle in the black pepper and Him/salt if using and then...be patient! Start to blend on a high speed and when necessary push it down from the sides. Process until a creamy texture has been reached. Sadly in my processor that takes about 15 minutes but hopefully it won't be as long for you. Then store in a container with an airtight lid in the fridge until ready to use. 

Assembly: 

Cut two slices from your Superfood Bread loaf....

Look at that seedy yummy goodness...
 
Slather your slices with the Black Olive Pate and then top with a slice of a vine-ripened tomato and some small rocket leaves. Then serve....

Enjoy! 

Thanks for stopping by and I hope your Saturday is as fulfilling as mine has been so far....not to mention I hope you get the chance to do your happy dance too! lol

~Red~ 

NB: The Superfood Bread is not my creation and therefore I take no credit for it whatsoever. It is the hard work and creation of Ella@ DeliciouslyElla and hers alone. But thankyou once again Ella for a fantastic recipe...~R~


Tuesday, 7 January 2014

Vegan Sloppy Black Eyed Peas (Slowcooker recipe)

Rocket & Roses HQ Play List:

Tina Dico ~ Room With A View 
Martina McBride ~ The Time Has Come 
Depeche Mode ~ Enjoy The Silence 
Thunder ~ Stormwater 
Rob Thomas ~ This Is How A Heart Breaks
U2 ~ Where The Streets Have No Name
Skin ~ Wings Of An Angel 
Auf Der Maur ~ Would If I Could
Kenny Wayne Shepherd Band ~ Was
Sharon D Clarke ~ Back On Track 
Shania Twain ~ Up!
P!nk ~ Trouble 
Pearl Jam ~ Why Go 
Audioslave ~ Show Me How To Live

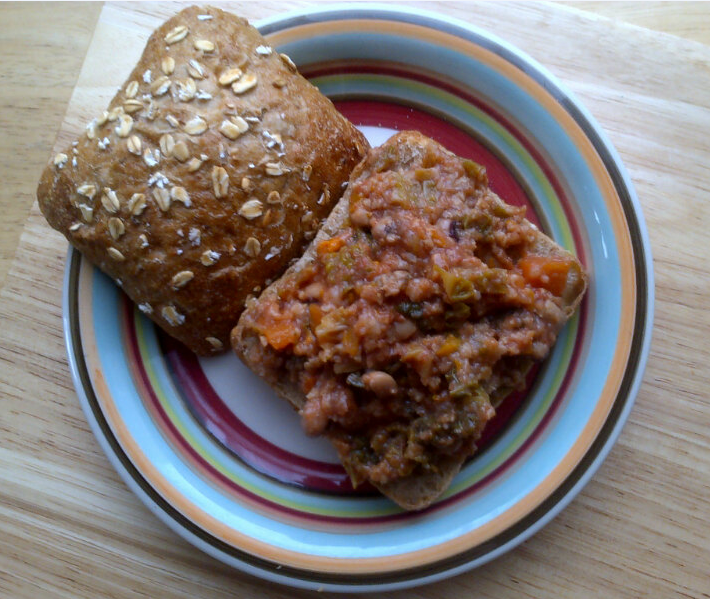
Black Eyed Peas...nope, not the group..but the humble little legume. Apparently it is believed that cooking them for a New Year brings prosperity. Well I sure need some of that so I fired up my slow cooker to make a batch of this New Orleans inspired dish. The recipe is from Kathy Hester's cookbook Vegan Slow Cooking although I found it posted on a random recipe website. It is very simple to put together and as it's such a small amount I was able to use my smallest slow cooker...it makes about 2.5 cups of sloppy joe. I have never made sloppy joes of any kind before so I was a little unsure as to how it was supposed to turn out. I had picked up a couple of sunflower rolls the day before so I saved them for this meal. 

I've had a little trouble with dried black eyed peas before so although it doesn't say to do so, I put mine into soak the night before. Aside from chopping a small amount of carrot, pepper and garlic the work is minimal. The instructions say a cooking time of 7-9 hours and I checked mine at the 7 hour mark and although it had all mulched down nicely I found the peas to be a little undercooked. I added the cabbage, puree and seasonings at this point and placed the lid back on and left it to cook for a further 2.5 hours. Now...I believe at this cooking time the peas were just cooked. But next time I would maybe add a little more water and give it 10 hours on Low. But that is just my personal preference...

The results when added to the firm Sunflower roll (which I ate as an open sandwich to avoid spillage..yes, yes I know..what a wuss! lol) was very enjoyable. Having never eaten Sloppy Joes before it was certainly an experience. I greatly enjoyed the taste and textures. And eventually I got the hang of the sandwich..lol. I don't think I'll ever be a closed Sloppy Joe kind of a gal...but whatever works is good, right? Give it a try...see which sandwich style you prefer...

Vegan Sloppy Black Eyed Peas....

Vegan Sloppy Black Eyed Peas     Yields 2.5 cups
(Recipe from Vegan Slow Cooking/Hester)

Morning ingredients

2 cups water 
1/3 cup dried black eyed peas
1/3 cup carrots, chopped
1/6 cup millet
2 tbsp minced bell pepper
1 clove garlic, minced
1 tsp Cajun seasoning 
1/8-1/4 tsp liquid smoke 

Evening ingredients:

1 cup minced greens collard, kale etc
2 tbsp tomato paste
salt and pepper to taste 

2-3 rolls/buns for serving (Obviously use GF bread if that is required)

In the morning:

Add the morning ingredients to the slow cooker. Cook on low setting for 7-9 hours. 

In the evening: 

About 30 minutes before you wish to serve this..you need to add the greens and tomato paste. Cover and allow to cook for the remaining 30 minutes. 

Right before serving add the salt and pepper, along with more Cajun seasoning if desired. Pile the sloppy mixture on your rolls. Serve....

Enjoy! 

Thanks for stopping by and I hope your Tuesday has been very good to you....

~Red~ 

NB: This recipe is not my creation and therefore I take no credit for it whatsoever. It is the hardwork and creative talent of Kathy Hester. ~R~